Planetary (And Lunar AP) On the Cheap (well, cheapER)
A lot of people who have a scope already want to get into AP. Unfortunately not all scopes are good for this, nor are all cameras. And AP can be a steep learning curve. That said, one of the easier and least-demanding types of AP is lunar and planetary. Nearly any scope can be used. and instead of a pricey DSLR or dedicated planetary imaging camera, you can do well with a $20 (or less) webcam, a 35mm film canister (or something that can serve the same purpose), and a hot glue gun.
Planetary imaging has some different requirements than Deep Sky, and when it comes to equipment, they're a little less demanding. For planetary imaging, you can do pretty well with an off-the-shelf webcam - not even something designed for AP. A $20 (or even cheaper) webcam. These days they offer plenty of resolution (you do not need megapixels here... and really don't want them), and they're cheap enough that if it breaks or something goes wrong with it, you're not out a couple grand.
Lunar imaging can be done the same way, but I'm going to discuss this in terms of Planetary imaging.
As I said, the requirements for lunar and planetary imaging are different from Deep Sky objects. The planets are bright, and you don't need long exposures. Because you don't need long exposures, a highly accurate equatorial mount isn't required. Tracking itself isn't actually required, but it does help a lot.
Before getting into the details, let me note here that there's really only 3 planetary targets worth talking about: Mars, Jupiter, and Saturn. These three offer nice amounts of detail and are fairly accessible to most telescopes.
Mercury is too close to the sun, and too small. Due to its orbit, it never rises above about 20-25° above the horizon, which means we're always looking at it through a dense slice of atmosphere, and that leads to a lot of blurring and distortion. All you can ever really see with Mercury are the phases like those of the moon... but barely.
Venus rises to about 45° at its maximum elongation, this means it just barely gets to a relatively decent height over the horizon for imaging, but you're still looking through quite a lot of airmass. It's almost as big as Earth, and not terribly far, though when it's closest it's not visible, it's still doable. But it offers almost nothing in the way of detail. The cloud details are very subtle, and typically require specific filters to bring them out. As with Mercury, its phases are its most interesting visual feature. You CAN get some decent images, but typically that's more of an expert-level task.
Out past Saturn we have Uranus. Uranus is significantly smaller than Saturn, and a whole lot further. For most amateurs, the best you can see is a tiny blue-green disk. It usually can be distinguished from a star, but only just barely. You can't see its rings without a major telescope, and same goes for any cloud patterns, of which there aren't many to begin with. With a really big amateur scope and a lot of work you can capture a little bit more than a blue-green disk, but not much.
Neptune is slightly smaller than Uranus... but much, much further out still. At an amateur level, Neptune is pretty much hopeless other than a smaller, bluer dot than Uranus.
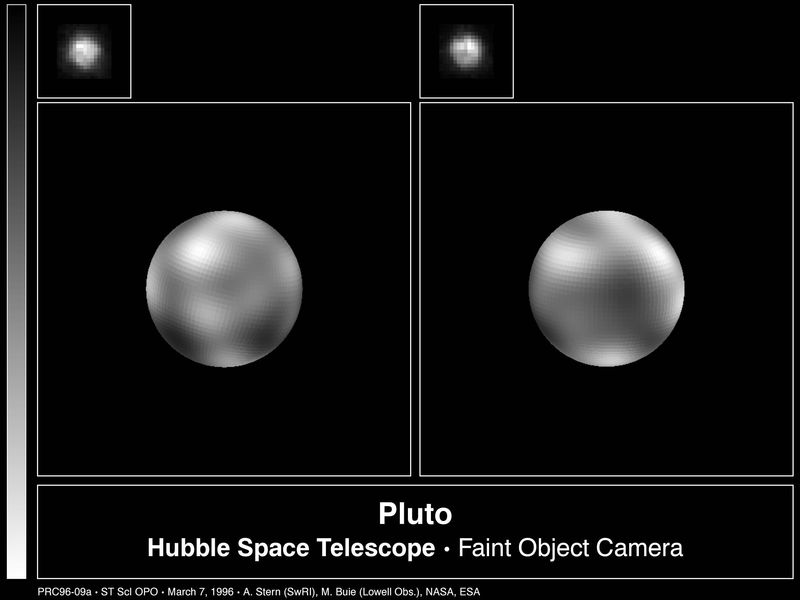
If you still count Pluto (let's not argue that now), then you're way out of luck Even the Hubble Space Telescope (HST) can't do much with it. This is about the best image we've ever taken of Pluto other than those taken by the New Horizons spacecraft as it flew by in 2015:
I was able to capture the following image of it in my club's C14 at our club observatory. This is about as good as any amateur can hope for:

Ok, so now that we've established that there are only 3 planets to shoot, how do we go about it.
For planetary imaging, you typically want the planet to take up as much of the image as reasonably possible. Here, we need to pay attention to field of view.
With visual observing, field of view is a matter of telescope focal length, eyepiece focal length, and eyepiece apparent field of view. The AFOV is basically the field of view of the eyepiece itself and is determined by the position of the field-stop in the eyepiece barrel. But let's set that number, the AFOV, aside for just a moment. If you take a telescope with a given focal length and two separate eyepieces, say 10 mm and 25 mm, that have the same AFOV, then the eyepiece with the shorter length, the 10 mm, will give you more magnification and a narrower field of view than the longer, 25 mm eyepiece. Stated a little more plainly: the higher magnification will give you a smaller field of view.
With imaging, the role of the eyepiece is played by the camera. Here, the key measures are the camera's image sensor dimensions. Most consumer-level DSLR cameras use what's known as an APS-C sensor. The specific measurements vary by manufacturer and sensor, but typically they're about 25-ish mm wide and 15-ish high. Pixel count here is not the concern... yet, we're talking the physical size of the sensor itself. On the other hand, a webcam is likely to have a sensor measuring around 4.8 by 3.6 mm (with a diagonal around 6mm). If you try these two sensors out in the same scope, you will find that the DSLR gives you a much wider field of view than the webcam. If you point them both at Jupiter, the field of view of the DSLR will show Jupiter as a pretty small dot on a big black background. If you use the webcam, it will show Jupiter a lot larger in the image.
Most webcams these days can do at least 1024x768 pixels, which is probably good enough. The DSLR may do a much higher resolution, but, again, it's a small dot on a big background. You might actually end up with a similar pixel resolution, depending on the size of the pixels, which would allow you to crop and enlarge the DSLR image. But you end up with a similar resolution in the end, and the webcam makes that a bit easier (and cheaper).
For planetary imaging, we also have to contend with the atmosphere, which around here sucks. Humidity, dust, air pollution, fog, pollen, etc... all of that screws with the view and add to that the turbulence in the air from ground level all the way up, and you end up with pretty mediocre seeing a lot of the time. This will degrade the level of detail available. which means a better pixel resolution may not be beneficial in the end, so a higher resolution camera may not be worth the trouble. I'd say a camera that does 1280x720 resolution is plenty, and even 1024x768 will do fine. I've seen some very nice images of Mars, Jupiter, and Saturn done with the original Meade DSI camera, which was only 510x492 pixels.
From here, the secret is in the processing.
With most AP, we achieve better images through stacking. Without delving into the details, stacking is basically a matter of signal processing through statistical analysis.
Let's say you take a single still-frame image of whatever astronomical target: let's say Mars. In that image, the planet covers a certain number of pixels. Each pixel corresponds to a small section of the planet, the size of the detail it captures is going to depend on the camera resolution and the telescope's aperture (larger apertures are better here as they provide smaller angular resolution). When you take that still image, it's not likely to be perfect. There's likely some rippling in the atmosphere blurring one part or another, perhaps some stray light or dust or something. Some pixels may be good, others may not.
Ideally, each pixel would be a perfect representation of the true surface of mars over which it appears. But if you were to take another picture of mars a moment later, you'd likely find it looks a little bit different. Not a lot, just a small amount. Take more, and you get more variation.
With stacking, what we do is first get a set of multiple images of the same target. Then, we align each image so that the same pixel position in each matches up with the same pixel position is covering the same patch of ground on Mars. Odds are most images have to shift a pixel or two left or right, up or down compared to other images in the group.
Next, we look at each pixel location and take the values of each pixel at that location for each image in the stack. Let me explain that a second.
In a digital image file, each pixel is represented by a numeric value. In a monochrome (i.e. not color) image, each pixel will have a value that represents how bright the light it captured was. If you have an old 8-bit camera, this will be a value between 0 and 255. If your camera is a CMOS, then it's a 14-bit value, a value between 0 and 16,383. A CCD gives you a 16-bit value of 0 to 65,535. Whichever you have, 0 represents totally dark, or black, while the highest number represents totally bright or white. Everything in between is a shade of gray. In a color image, you have 3 values for each pixel: the brightness levels for red, green, and blue. Regardless of color or monochrome, the key here is that each pixel is represented by a numeric value for brightness. And that's where the analysis comes in.
So when we're stacking, we look at the value in each images for the corresponding pixel. One option we have here is to simply calculate the average. If you think about it, if the pixel in each separate image corresponds to the same thing, then they should all be the same value, but if we have a little variation due to atmospheric conditions, or sensor noise, or what have you, if we calculate the average, we should come to a value that's pretty close to what you'd expect in a perfect image. We could also go with the median, which is the number right in the middle of the set if you arrange them all in order. Or we could take the mode, which is the most common value in the set. Whichever option you choose here, you're ending up with a value that should be close to the "true" value of the pixel.
Another option is to do a weighted average. Here, you calculate the mean and then the standard deviation, which is the average difference between individual values and the mean itself. If you have 100 samples for the pixel and a most appear within a small range of values, say between 50 and 55 on a scale of 0 to 255 (8 bits), and a handful are way off, like 0 or 150, then you can probably expect that those are due to noise or interference and it's safe to exclude them. If you use the standard deviation as a filter and only accept pixels that are more or less than the standard deviation from the mean, and then re-calculate the average, then you end up with a weighted average that is more likely to be accurate. In the end, you accept the average as the value for your final image.
This process is done for every corresponding pixel, which leaves you with a resulting image that's the best-estimate of the correct value for each pixel, giving you the best possible image from the data.
Another trick can be used here: drizzle. This basically takes neighboring pixels and uses them to interpolate higher resolutions. Here, you could start with 640x480 resolution and end up with double or triple the resolution.Ok, so now the reason a webcam is a good option for this is due to 2 reasons. First, you don't need long exposures for planetary imaging. Webcams aren't really designed for really low-light use, but that's fine here. We don't need exposure times of even 1 second usually. Depending on the scope and how bright the target is, you might be able to do a standard 30fps video capture. 30 seconds at 30fps gives you 900 individual exposure frames to work with. Even if you have to throw out half of them, even 2/3, you still end up with a few hundred to run through the stacking. As you might expect, the stacking process gets more and more complex the more images and the more pixels per image. Using a webcam means you're not stacking 8, 10, 20, or more million pixels, which means the stacking process goes faster and you waste less storage space on the hard drive.
So, back to hacking the camera.
Most cheap webcams will have a lens and a ring or something to adjust the lens forward or back from the sensor to focus. The first thing you need to do is remove that. You might have to unscrew and disassemble the camera, or you might just break it off. As long as the image sensor and electronics are fine, you're fine. You just want to expose the sensor directly with no lens.
Now most webcams won't just fit into the focuser this way. So once you remove the lens assembly, you need something to serve as an eyepiece barrel flange. A 35mm film canister is perfect for this... but since film is pretty rare, these are getting rare. If you have one to spare, then great. if not, you just need to find something that will suffice. If you have or have access to a 3D printer you can print one. If you have a cheap eyepiece you don't mind getting rid of, you can probably remove the flange from it. You might find a piece of pvc pipe, or some kind of tube that will work. As long as it fits into the focuser like an eyepiece, you're fine.
If it's a film canister, ditch the cap and cut off the bottom (alternatively you can keep the cap and cut a hole in it. The idea here is to attach it to the camera so when inserted into the focuser, the light from the scope shines on it. Use a hot glue glue gun (or epoxy, or whatever you prefer) to attach the makeshift barrel flange to the camera. And that's it. You now have a DIY planetary imaging cam.
There's several software options. You don't need anything fancy, just something to record video. I've used AMCAP in the past. Anything that will record and save the video file will do. Just connect it to a laptop and go. Once you've got your video file, you can use freeware like Registax or AutoStakkert to process, and there's dozens of tutorials online for using them.
Now you CAN use a cell phone here. The sensor size is likely to be similar, maybe even smaller. But unless you want to hack your cam, you have a lens in the way. The cell phone is also likely to play around with focus, brightness and contrast, etc. You can find apps that give you better control, but it's still an issue. With a cell phone, you need to use an eyepiece as well, since the lens will screw with the image focus. And with a cell phone, the high pixel count means large files with more resolution than you need by far.
I have an 8 inch scope. It's good for around 0.57 arcseconds of resolution. With an iPhone 11, the 1/2.55 inch 12 megapixel sensor would give you resolution of 0.14 arcseconds per pixel, which is way oversampled. Essentially, you're wasting resolution here since the scope can't provide it (and the atmosphere makes it worse still). This means collecting a ton of data that you don't need and just slows processing and wastes hard drive space. You CAN do it, but it doesn't benefit you. The only real benefit you get here is the built-in screen. And I agree, that's helpful, but a laptop has a bigger screen still, which will be a lot easier for focusing.
So, in the long run, if you don't want to shell out for a camera designed for planetary imaging like the ZWO ASI224MC, (which is relatively inexpensive, but still more than a webcam), a $20 or so webcam and a half hour of hacking will get the job done pretty well. Note, the ZWO I listed only has 1304x976 resolution, it's not like you get a lot more resolution out of it, though it does have better sensitivity and some other added bonuses... but for a beginner, not $200+ worth.


Comments
Post a Comment